Category: Desserts

  • Spooktacular Spider Web Cake: A Creepy Confection to Celebrate Halloween

    Spooktacular Spider Web Cake: A Creepy Confection to Celebrate Halloween

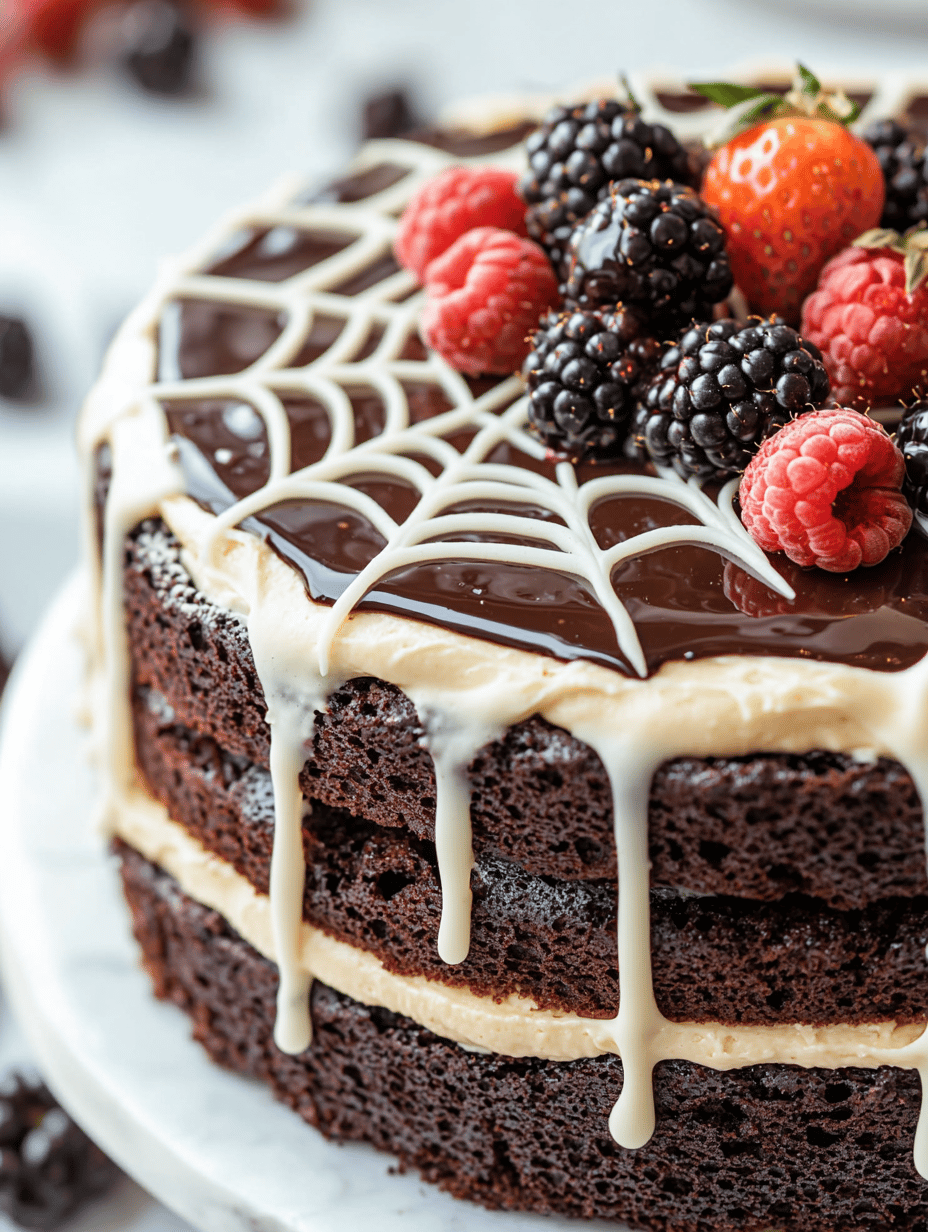
    Every October, I find myself craving something more than just the usual pumpkin pie or caramel apples.
    This year, I decided to push my baking boundaries and create a show-stopping Halloween dessert that combines artistry with a touch of spooky elegance.
    The Spider Web Cake not only looks haunting but also offers a delightful, moist crumb layered with rich flavors that evoke the eerie season.

    What makes this cake truly captivating is the intricate web design, painstakingly made with contrasting icing.
    Perfect for a Halloween gathering, it turns a simple cake into a mysterious, edible piece of art.
    Plus, the process of decorating becomes a fun, chaotic activity—perfect for embracing the spirit of Halloween.

    Spider Web Cake

    The Spider Web Cake is a moist layered cake decorated with an intricate web pattern made from contrasting icing, creating a spooky yet elegant Halloween dessert. It features a tender crumb with rich flavors, and its web design is crafted with precision to resemble a spooky spider’s web, making it a striking centerpiece. The decoration process adds a fun, chaotic element perfect for Halloween celebrations.
    Prep Time 30 minutes
    Cook Time 35 minutes
    Total Time 1 hour 5 minutes
    Servings: 8
    Course: Main Course
    Cuisine: Halloween
    Calories: 480

    Ingredients
      

    • 2 1/2 cups all-purpose flour sifted
    • 2 1/2 cups granulated sugar
    • 2 cups powdered sugar
    • 1/4 cup heavy cream for icing consistency
    • 1 tablespoon black food coloring

    Equipment

    • Mixing bowls
    • Electric mixer
    • Round cake pans
    • Cooling rack
    • Piping bags
    • Fine tips for piping
    • Offset spatula

    Method
     

    1. Preheat your oven to 350°F (175°C). Grease and flour two round cake pans to ensure the cakes release easily after baking.
    2. In a large mixing bowl, combine the sifted flour and sugar. Add the softened butter and beat with an electric mixer on medium speed until the mixture is light and fluffy, about 3-4 minutes. This creates the base for your cake batter.
    3. One at a time, add the eggs to the mixture, beating well after each addition. This helps incorporate air for a tender crumb.
    4. Mix in the vanilla extract. Then, alternately add the buttermilk and dry ingredients, starting and ending with the dry. Mix just until combined after each addition to keep the batter smooth.
    5. Divide the batter evenly between the prepared cake pans and smooth the tops with an offset spatula. Bake for about 30-35 minutes, or until a toothpick inserted into the center comes out clean. Let the cakes cool in their pans for 10 minutes, then transfer to a wire rack to cool completely.
    6. While the cakes cool, prepare the black icing. In a mixing bowl, beat the powdered sugar with heavy cream until smooth and spreadable. Mix in the black food coloring gradually until you achieve a deep black shade suitable for piping.
    7. Once the cakes are fully cooled, place one layer on your serving plate. Spread a generous layer of icing over the top with an offset spatula, then add the second cake layer on top and frost the entire cake evenly.
    8. Fill a piping bag fitted with a fine tip with the black icing. Start piping a web pattern from the center of the cake outward in concentric circles. Then, draw straight lines from the center to the edges, creating a spider web effect.
    9. Refine your web design by touching up any uneven lines or gaps with additional icing. Take your time to make the web as intricate and symmetrical as possible for a spooky, haunted look.
    10. Once the web pattern is complete, chill the cake for 15-20 minutes in the refrigerator to set the icing. This makes the web stand out and prevents smudging during serving.
    11. Slice the cake carefully to reveal the moist layers and striking web decoration. Serve slices to enjoy the rich flavor and spooky presentation.

    This Spider Web Cake is more than just a dessert; it’s a conversation starter and a perfect centerpiece for October festivities.
    The texture of the moist cake combined with the glossy, web-like frosting creates an unforgettable experience. Plus, its design allows for a fun, creative chaos that makes Halloween decorating even more memorable.

    As the spooky season winds down, this cake stands as a playful reminder of the joys of baking and creating. It captures both the eerie charm and the sweet nostalgia of childhood Halloweens while offering a touch of grown-up decadence. It’s a celebration of the season, served on a plate.

  • Sweet Summer Escape: Irresistible Peach Crumble

    Sweet Summer Escape: Irresistible Peach Crumble

    Can you imagine the scent of ripe peaches mingling with warm, buttery crumble as the oven fills your kitchen? During the peak of summer, I love turning fresh peaches into something that feels like a sweet escape, even if only for dessert. This recipe is my go-to when I want a touch of nostalgia and a burst of sunshine on my plate.

    What makes this peach crumble special isn’t just the juicy fruit or crunchy topping — it’s how effortlessly it adapts to different occasions. Whether served warm with vanilla ice cream or chilled on a lazy afternoon, it always hits the right note. It’s a reminder that simple ingredients can create memorable moments.

    Peach Crumble

    This peach crumble features fresh, ripe peaches baked under a golden, buttery oat topping. The dish combines tender fruit with a crunchy, slightly crumbly texture, resulting in a warm dessert with a bubbly sauce and crisp topping. It is typically served warm, often with ice cream or whipped cream.
    Prep Time 15 minutes
    Cook Time 40 minutes
    Total Time 55 minutes
    Servings: 6
    Course: Main Course
    Cuisine: American
    Calories: 250

    Ingredients
      

    • 4 cups ripe peaches, sliced pitted and peeled if desired
    • 1/2 cup granulated sugar
    • 1 tablespoon lemon juice freshly squeezed
    • 1 cup old-fashioned oats
    • 1/2 cup all-purpose flour
    • 1/2 cup brown sugar packed
    • 1/2 cup unsalted butter cold, cut into small pieces
    • 1/2 teaspoon ground cinnamon

    Equipment

    • 9-inch baking dish
    • Mixing bowls
    • pastry cutter or fork
    • Measuring cups and spoons
    • paring knife

    Method
     

    1. Preheat the oven to 375°F (190°C). In a large bowl, gently toss sliced peaches with granulated sugar and lemon juice until evenly coated.
    2. Transfer the coated peaches into a 9-inch baking dish, spreading them out into an even layer.
    3. In a separate mixing bowl, combine oats, flour, brown sugar, and cinnamon. Mix thoroughly to blend all dry ingredients.
    4. Add the cold, diced butter to the dry mixture. Using a pastry cutter or fork, cut the butter into the mixture until it resembles coarse crumbs with some pea-sized pieces.
    5. Sprinkle the crumble topping evenly over the peaches in the baking dish, covering all the fruit.
    6. Place the dish into the oven and bake for about 40 minutes, or until the topping is golden brown and the filling is bubbling around the edges.
    7. Remove from the oven and let it cool slightly. The crumble should be fragrant with a crisp topping and tender, juicy peaches underneath.

    Using fresh peaches at their peak offers a nuanced sweetness and a fragrant aroma that frozen fruit just can’t match. This crumble’s crispy topping and juicy filling make each bite both tender and crunchy, a perfect contrast that keeps everyone coming back for more.

    As the seasons shift, a peach crumble brings a cozy, summery vibe to any table. It’s an easy crowd-pleaser, easy to customize, and always a sweet reminder of lazy, sun-drenched days. No matter how busy life gets, this dessert remains a comforting favorite to return to.

  • Spiced Pumpkin Bread: A Seasonal Baking Adventure

    Spiced Pumpkin Bread: A Seasonal Baking Adventure

    As autumn chills settle in, I found myself on a quest to reinvent classic pumpkin bread with a twist. This recipe isn’t just about creating another loaf; it’s about capturing the essence of fall in every bite, with unexpected spices that dance on your tongue. The aroma alone—cinnamon, nutmeg, and a hint of ginger—creates a cozy ambiance even before the first slice emerges from the oven.

    What makes this pumpkin bread truly special is its moistness and rich flavor, which transcends the typical quick bread. I like to think of it as a nostalgic nod to childhood mornings, intensified by a modern splash of cardamom and a touch of maple syrup. During the process, the kitchen fills with a warm, inviting scent that makes patience seem worth it.

    Perfect for everything from brunch to an afternoon snack, this loaf shines when paired with a smear of butter or cream cheese. It’s a comforting presence during holiday gatherings, yet simple enough to whip up any day you crave a taste of fall’s bounty. Baking it feels like a mindful ritual—smelling, tasting, and savoring the fleeting beauty of the season.

    Spiced Pumpkin Bread

    This pumpkin bread combines pureed canned pumpkin with a moist, tender crumb, achieved through mixing and baking. It features aromatic spices like cinnamon, nutmeg, ginger, and a hint of cardamom, resulting in a flavorful loaf with a slightly dense, soft texture and a golden-brown crust.
    Prep Time 15 minutes
    Cook Time 1 hour
    Total Time 1 hour 15 minutes
    Servings: 8
    Course: Main Course
    Cuisine: American
    Calories: 220

    Ingredients
      

    • 1 cup all-purpose flour
    • 1 cup granulated sugar
    • 1/2 cup brown sugar packed
    • 1/2 cup vegetable oil
    • 2 large eggs
    • 1 cup canned pumpkin puree
    • 1 teaspoon cinnamon
    • 1/2 teaspoon nutmeg
    • 1/2 teaspoon ginger
    • 1/4 teaspoon cardamom optional
    • 1 teaspoon baking soda
    • 1/2 teaspoon salt
    • 1 tablespoon maple syrup optional, for added moisture

    Equipment

    • Mixing bowls
    • Loaf pan

    Method
     

    1. Preheat your oven to 350°F (175°C). Grease a standard loaf pan and set it aside.
    2. In a large mixing bowl, whisk together the flour, baking soda, salt, cinnamon, nutmeg, ginger, and cardamom until evenly combined. This creates a flavorful dry mixture that will give the bread its warm spice profile.
    3. In a separate bowl, beat the eggs with the granulated and brown sugars until the mixture is smooth and slightly fluffy, which helps incorporate air for a lighter texture.
    4. Pour in the vegetable oil and maple syrup, then whisk again until the batter appears glossy and well combined.
    5. Add the pumpkin puree to the wet mixture, folding gently until fully incorporated and the batter is smooth with no streaks.
    6. Gradually fold the dry ingredients into the wet batter, just until no dry patches remain. Be careful not to overmix, as this keeps the bread tender.
    7. Pour the thick batter into the prepared loaf pan, smoothing the top with a spatula so it’s even and ready for baking.
    8. Bake in the preheated oven for 60-65 minutes, or until a toothpick inserted into the center comes out clean and the top is golden brown.
    9. Remove the bread from the oven and let it cool in the pan for about 15 minutes, allowing the structure to settle.
    10. Transfer the loaf to a wire rack and allow it to cool completely before slicing; this helps maintain its moist interior.
    11. Slice the pumpkin bread with a serrated knife and serve it warm or at room temperature, perhaps with butter or cream cheese for extra richness.

    This pumpkin bread isn’t just a recipe; it’s a small celebration of seasonal flavors and comforting textures. I love how each bite offers a complex array of spices that remind me of brisk walks through leaf-strewn streets. It’s a treat that makes any day feel a little more special, a warm reminder to slow down and enjoy the process.

    As the leaves turn and cooling air settles in, this loaf provides the perfect cozy moment. Whether it’s a quiet morning with a hot coffee or a lively family breakfast, it fits seamlessly into the season’s rhythm. Baking this bread is a gentle reminder that the simplest ingredients can craft something truly memorable.

  • Wickedly Whimsical: Halloween Brain Jello Mold to Spook and Delight

    Wickedly Whimsical: Halloween Brain Jello Mold to Spook and Delight

    As October chills settle in, I love diving into the creepier side of dessert crafting. Nothing beats the shock value of a gooey, brain-shaped Jello that’s perfect for Halloween parties. Its squishy, translucent look makes it both fascinating and slightly unsettling, just how I like it for this spooky season.

    This recipe isn’t just about presentation; it’s also about the sensory thrill — each bite with a wobbly, fruity squeeze that sparks a nostalgic shiver. The vibrant colors and eerily realistic texture turn a simple treat into a conversation starter. Plus, creating it offers a chance to unleash your inner mad scientist in the kitchen.

    Brain-Shaped Fruity Jello

    This dessert involves preparing flavored gelatin mixtures that are poured into brain-shaped molds to create a translucent, squishy texture. The final product features a slimy, wobbling appearance with vibrant colors, mimicking a realistic brain for Halloween decorations or themed parties.
    Prep Time 20 minutes
    Cook Time 10 minutes
    Total Time 30 minutes
    Servings: 8
    Course: Main Course
    Cuisine: Halloween
    Calories: 80

    Ingredients
      

    • 3 cups fruit juice or flavored water for base flavor
    • 3 tbsp unflavored gelatin powder to set the dessert
    • 0.5 cup sugar optional, for sweetness
    • 1 drop food coloring red, green, or purple for effect
    • fruit slices or candies assorted fruits or candies for colorful accents inside the gelatin

    Equipment

    • Mixing bowls
    • Measuring cups
    • Saucepan
    • Brain-shaped gelatin mold
    • Whisk

    Method
     

    1. Start by pouring the fruit juice or flavored water into a saucepan and warming it over medium heat until it’s hot but not boiling.
    2. sprinkle the unflavored gelatin powder evenly over the warm liquid, then whisk continuously until the gelatin fully dissolves and the mixture is smooth.
    3. Stir in the sugar if using, ensuring it dissolves completely and the mixture remains glossy and slightly thickened.
    4. Divide the gelatin mixture into separate bowls if you plan to use different colors, and add a few drops of food coloring to each bowl, stirring gently until the colors are vibrant.
    5. Pour a thin layer of the colored gelatin into each cavity of your brain-shaped mold, filling just halfway to create depth.
    6. Add small pieces of fruit slices or candies into the partially filled mold, arranging them to resemble internal features of a brain.
    7. Gently pour the remaining gelatin mixture over the fruit, filling the mold to the top without disturbing the fruit placement.
    8. Place the mold in the refrigerator and chill for at least 4 hours or until the gelatin is firm and jiggles nicely.
    9. Once set, gently unmold the gelatin by running warm water over the outside of the mold for a few seconds, then carefully invert onto a serving plate.
    10. Observe the gelatin’s translucent, squishy appearance, with colorful internal details peeking through, perfect for a spooky yet edible decoration.
    11. Slice or serve the brain-shaped gelatin as desired, letting it wobble invitingly and ready to delight your spooky guests.

    Making a Halloween Brain Jello Mold is a fun way to add some grotesque charm to your spooky spread. It’s surprisingly easy, and the sight of guests’ surprised faces makes all the effort worthwhile. Plus, it’s a playful excuse to get a little messy and creative with your food art.

    This mold is the perfect centerpiece to invoke a little chaos at your gory gathering. As the season’s scare fades, it leaves behind a sweet memory of ooze and giggles that only Halloween can deliver. Sometimes, it’s the perfect touch of creepy that makes the holiday truly memorable.

  • Spooky Good: Halloween Pumpkin Cheesecake Bars with a Twist

    Spooky Good: Halloween Pumpkin Cheesecake Bars with a Twist

    Every October, I seek something more than just the usual pumpkin pie. This year, I decided to craft a dessert that combines the creamy richness of cheesecake with the whimsical charm of Halloween: Pumpkin Cheesecake Bars with a spooky twist. The smell of cinnamon, ginger, and sweet pumpkin fills my kitchen, evoking childhood memories of carving jack-o’-lanterns and chasing after fireflies.

    What sets these bars apart is their layered surprise—crisp graham cracker crust, smooth pumpkin cheesecake, and a swirling of dark chocolate or caramel for that haunted touch. They’re perfect for both party platters and quiet nights watching ghost stories. Plus, they’re surprisingly easy to make, even if chaos briefly takes over your baking space.

    Pumpkin Cheesecake Bars with Spooky Twist

    These pumpkin cheesecake bars feature a crisp graham cracker crust topped with a smooth, spiced pumpkin filling, finished with a swirl of dark chocolate or caramel for a haunted effect. The layered dessert combines creamy and crunchy textures, and is baked until set with a slightly firm top. Their visually striking appearance makes them perfect for Halloween celebrations.
    Prep Time 20 minutes
    Cook Time 40 minutes
    Total Time 1 hour
    Servings: 12
    Course: Main Course
    Cuisine: American
    Calories: 320

    Ingredients
      

    • 1 1/2 cups Graham cracker crumbs about 10-12 full crackers crushed finely
    • 1/4 cup granulated sugar for crust
    • 1/2 cup unsalted butter melted
    • 16 oz cream cheese softened
    • 1 cup pumpkin puree canned or cooked fresh pumpkin
    • 3 large eggs room temperature
    • 3/4 cup granulated sugar for filling
    • 1/4 cup all-purpose flour to stabilize filling
    • 2 teaspoons cinnamon ground
    • 1/2 teaspoon ginger ground
    • 1/4 teaspoon cloves ground
    • 1/4 teaspoon nutmeg ground
    • 1/2 cup dark chocolate or caramel sauce for swirling, optional

    Equipment

    • Mixing bowls
    • 9×13 inch baking pan
    • Measuring cups and spoons
    • Electric mixer or whisk
    • Rubber spatula
    • Baking sheet

    Method
     

    1. Preheat your oven to 350°F (175°C). Mix graham cracker crumbs, sugar, and melted butter in a bowl until well combined. Press this mixture evenly into the bottom of a 9×13 inch baking pan to create the crust.
    2. Bake the crust for about 10 minutes until it’s slightly firm and fragrant. Remove from oven and set aside to cool slightly.
    3. In a large mixing bowl, beat softened cream cheese until smooth and creamy.
    4. Add pumpkin puree and eggs to the cream cheese, mixing gently until combined and smooth. Incorporate sugar, flour, cinnamon, ginger, cloves, and nutmeg, mixing until just blended.
    5. Pour the pumpkin cheesecake filling over the cooled crust, spreading evenly with a spatula for a smooth top.
    6. Bake the assembled bars at 350°F (175°C) for 35-40 minutes, or until the edges are set and the center slightly jiggles when gently shaken.
    7. Once baked, turn off the oven and let the bars cool inside for about 30 minutes. Then, transfer to a wire rack and cool completely at room temperature.
    8. When completely cooled, use a spoon or piping bag to swirl dark chocolate or caramel sauce over the top, creating a spooky, marbled pattern.
    9. Slice the bars into squares and serve them at room temperature or chilled for a richer texture.

    Notes

    For extra Halloween flair, decorate with edible eyes or small candy pumpkins. Store leftover bars in an airtight container in the refrigerator for up to 3 days.
    These pumpkin cheesecake bars are more than a treat—they’re a conversation starter at any October gathering. When you cut through their silky filling and see the spooky motifs or dark chocolate decor, it’s a moment of simple joy. They remind us that dessert, like Halloween, is about magic, mischief, and sharing good times.

    As the season deepens and the nights grow longer, these bars bring a cozy yet festive feel. They’re not just for decoration or fleeting moments of sweetness—they’re about creating memories, one bite at a time.

  • Spooky Sweetness: Halloween Pumpkin Rice Krispie Treats

    Spooky Sweetness: Halloween Pumpkin Rice Krispie Treats

    Every October, I find myself craving something sweet and with a pinch of seasonal magic. These Halloween Pumpkin Rice Krispie Treats are my secret stash for busy days when I want a quick, festive snack that captures the spirit of fall. They turn a simple treat into a playful mess of orange and green, perfect for any spooky gathering.

    What makes these treats stand out is not just their charming appearance but the nostalgic crunch of rice cereal every bite brings. The pumpkin flavor sneaks in subtly, reminding you of the cool, crisp air outside. Plus, they make the best messy project with kids or friends, since everyone loves a little chaos in the kitchen.

    Halloween Pumpkin Rice Krispie Treats

    These Halloween Pumpkin Rice Krispie Treats are no-bake confections made by melting marshmallows and butter, then mixing in orange-colored rice cereal and pumpkin flavoring. Once combined, the mixture is pressed into a pan and shaped into festive pumpkins, resulting in a crunchy, sweet snack with a bright orange appearance and playful texture.
    Prep Time 15 minutes
    Cook Time 10 minutes
    Total Time 25 minutes
    Servings: 12
    Course: Main Course
    Cuisine: American
    Calories: 150

    Ingredients
      

    • 4 cups marshmallows preferably mini marshmallows
    • 3 tablespoons unsalted butter
    • 1 teaspoon vanilla extract
    • 5 cups rice cereal plain rice krispies or similar
    • 1 teaspoon orange food coloring gel or liquid
    • 1/2 teaspoon pumpkin spice extract or pumpkin flavoring

    Equipment

    • Large mixing bowl
    • Saucepan
    • Spatula
    • 9×13-inch baking dish
    • Parchment paper or silicone mat

    Method
     

    1. Grease a 9×13-inch baking dish with butter or line it with parchment paper for easy removal.
    2. In a large saucepan, melt the butter over low heat until it’s fully melted and starts to smell fragrant.
    3. Add the marshmallows to the melted butter and stir constantly with a spatula until completely melted and glossy, about 3-5 minutes.
    4. Remove the saucepan from heat and stir in the vanilla extract, pumpkin spice flavoring, and orange food coloring until evenly combined and the mixture is bright orange.
    5. Pour the rice cereal into the saucepan and gently fold it into the marshmallow mixture until evenly coated and vibrant orange.
    6. Transfer the mixture quickly into the prepared baking dish and press it evenly into a flat layer using a spatula or even your clean hands.
    7. Let the mixture chill at room temperature for 15-20 minutes, allowing it to set and become firm.
    8. Once firm, cut the treats into pumpkin shapes using cookie cutters or a sharp knife and decorate as desired with additional icing or candy if you like.
    9. Arrange the shaped treats on a plate or serve directly for a festive, crunchy Halloween snack.

    These Halloween Pumpkin Rice Krispie Treats are more than just a festive snack—they’re a small celebration of fall’s whimsy and chaos. The mix of crunchy marshmallow with pumpkin spice aroma is utterly irresistible, especially in the cool evening air. Making these always sparks joy, whether for a quick family treat or a spooky weekend project.

    As the season shifts, these treats serve as a cheerful reminder of the fun that can be found in simple ingredients. They’re perfect for turning an ordinary day into a whimsical autumn memory. In the end, the mess and chaos just add to the charm of these seasonal bites.

  • Spooky Season Surprise: The Ultimate Pumpkin Cheesecake

    Spooky Season Surprise: The Ultimate Pumpkin Cheesecake

    As the leaves turn crisp and fall decor creeps into every corner, I find myself craving something that captures the essence of autumn. But this isn’t just any pumpkin dessert—it’s a cheesecake with a secret twist, inspired by my grandma’s vintage bakery recipes that have a dash of chaos and a sprinkle of nostalgia. The smell of cinnamon, nutmeg, and roasting pumpkin fills my kitchen, stirring memories of old harvest festivals and chilly Sunday mornings.

    This recipe challenges the notion that pumpkin desserts are only for pies. It’s a rich, velvety cheesecake blending creamy dairy with the comforting spices of fall, all nestled in a graham cracker crust. Every bite offers a balance of sweetness and spice, a whisper of earthiness from the pumpkin, and a smooth, melt-in-the-mouth texture that might just make it your new favorite seasonal treat.

    **WHY I LOVE THIS RECIPE?**

    • Joyful chaos of mixing cream cheese with pumpkin—like a warm hug in a bowl.
    • Relishes childhood memories of baking with my grandma’s old kitchen timer.
    • Prides me with its simple elegance and complex flavors.
    • Nostalgic aroma that fills the house with seasonal cheer.
    • Perfect for entertaining without needing a full oven marathon.

    **AVOID MY DISASTER (You’re Welcome)**

    • FORGOT to pre-bake the crust? Crumbles everywhere—quickly press it back and bake again!
    • DUMPED hot water on the filling? Cool it quickly with an ice pack around the bowl.
    • OVER-TORCHED the crust? Cover with foil and slow-bake for a softer, less burnt edge.
    • MISREAD the recipe? Double-check ingredients; pumpkin can be sneaky in the can!

    **QUICK FIXES THAT SAVE YOUR DAY**

    • When the filling is too thick, splash in a little heavy cream to loosen it.
    • Patch a crack by gently filling it with extra batter and smoothing with a spatula.
    • Shield a browned edge by tenting with foil mid-baking.
    • When crust is soggy, bake it at 375°F for five minutes to crisp it up.
    • If you smell burnt sugar, remove immediately and cover with foil – rescue moment!

    Autumn Pumpkin Cheesecake

    This pumpkin cheesecake combines a creamy, velvety filling with warm spices like cinnamon and nutmeg, baked atop a crunchy graham cracker crust. The dessert has a smooth, dense texture with a ribbon of pumpkin flavor and a slightly spiced topping, giving it an inviting, rustic appearance.
    Prep Time 20 minutes
    Cook Time 1 hour
    Total Time 1 hour 20 minutes
    Servings: 8
    Course: Main Course
    Cuisine: American
    Calories: 450

    Ingredients
      

    • 1 1/2 cups Graham cracker crumbs about 10 full crackers processed into fine crumbs
    • 1/4 cup granulated sugar
    • 1/2 cup unsalted butter melted
    • 3 8 oz full-fat cream cheese, softened
    • 1 cup pumpkin puree canned (not pie filling)
    • 3 large eggs
    • 1/2 cup granulated sugar for the filling
    • 1 1/2 teaspoons ground cinnamon
    • 1/2 teaspoon ground nutmeg
    • 1/4 teaspoon ground ginger
    • 1/4 teaspoon ground allspice
    • 1/2 teaspoon salt

    Equipment

    • Mixing bowls
    • Hand mixer or stand mixer
    • 8-inch springform pan
    • Rubber spatula
    • Measuring cups and spoons
    • Baking sheet
    • Aluminum foil

    Method
     

    1. Combine graham cracker crumbs and sugar in a bowl, then pour in melted butter and mix until the crumbs are evenly coated and resemble wet sand.
    2. Press the crumb mixture firmly into the bottom of an 8-inch springform pan to create an even crust layer. Bake in a preheated 350°F oven for 10 minutes to set the crust, then remove and cool slightly.
    3. In a large bowl, beat the softened cream cheese with a hand or stand mixer until smooth and creamy, about 2-3 minutes, while listening for a gentle flicking sound as it blends.
    4. Add the pumpkin puree and half a cup of sugar to the cream cheese, mixing until fully combined and the mixture appears smooth with no lumps.
    5. One at a time, beat in the eggs, mixing just until each is incorporated before adding the next, until the filling is silky and slightly airy.
    6. In a small bowl, whisk together cinnamon, nutmeg, ginger, allspice, and salt, then fold these spices into the pumpkin filling to evenly distribute the warm flavors.
    7. Pour the filling into the cooled crust, smoothing the top with a spatula to create an even surface—listen for the gentle settle and see the smooth, shiny top form.
    8. Place the springform pan on a baking sheet to catch any potential drips and bake at 350°F for about 60 minutes, until the edges are set and the center gently jiggles when tapped.
    9. Once baked, turn off the oven, crack the door open slightly, and let the cheesecake cool inside for 1 hour—this prevents cracks and helps it set gradually.
    10. Remove the cheesecake from the oven, run a thin knife around the edge to loosen, then chill in the refrigerator for at least 4 hours or overnight for the best texture.
    11. Serve the cheesecake chilled, optionally garnished with a sprinkle of cinnamon or a dollop of whipped cream for a finishing touch.

    This pumpkin cheesecake isn’t just a dessert; it’s a celebration of fall’s rich flavors and memories. Its creamy texture, combined with warming spices, makes it perfect for cozy gatherings or quiet evenings alone. As the season changes, this recipe will remind you of the small joys found in the simplest ingredients.

    In a world rushing toward winter, taking time to bake something that connects us to past seasons feels meaningful. The aroma alone can turn any space into a welcoming haven. So, let the oven work its magic, and enjoy each silky, spiced forkful—relaxing, comforting, and just right for now.

  • Spooky Sweetness: Halloween Candy Corn Parfaits with a Twist

    Spooky Sweetness: Halloween Candy Corn Parfaits with a Twist

    As the leaves turn and Halloween nears, I find myself craving a treat that recalls childhood chaos and autumn nostalgia simultaneously. Candy corn, with its unmistakable orange, yellow, and white layers, has always been a divisive icon of the season. Today, I’m blending it into a parfait that’s more than just candy; it’s an ode to festive chaos and cozy indulgence.

    This dessert isn’t just about layered sweetness; it’s about surprise textures and unexpected flavor pairings. The crunchy candy corn contrasts beautifully with smooth, creamy elements, creating a sensory party in every spoonful. Plus, it’s a playful way to use up leftover candies while celebrating the spirit of fall.

    ## WHY I LOVE THIS RECIPE?

    – It combines childhood favorites with grown-up sophistication.
    – The vibrant colors boost mood and add festive flair.
    – Perfect for parties, easy to assemble, and highly customizable.
    – It brings back nostalgic memories of Halloween nights, but with a modern twist.
    – A chaos of textures that keeps every bite interesting.

    Candy Corn Parfait

    This layered dessert features crushed candy corn incorporated into creamy dairy elements, creating a colorful and textured parfait. The dish combines crunchy candy with smooth, whipped textures, resulting in a festive treat with vibrant visual appeal.
    Prep Time 10 minutes
    Total Time 10 minutes
    Servings: 4
    Course: Main Course
    Cuisine: American
    Calories: 250

    Ingredients
      

    • 2 cups heavy cream chilled
    • 1/2 cup powdered sugar
    • 1 teaspoon vanilla extract
    • 1 cup crushed candy corn about 10 pieces, lightly crushed
    • 1 cup plain Greek yogurt or vanilla yogurt
    • 1 cup candy corn whole, for garnish

    Equipment

    • Mixing bowls
    • Whisk
    • Piping bag or spoon
    • Serving glasses or jars

    Method
     

    1. Pour the heavy cream into a chilled mixing bowl and add powdered sugar and vanilla extract.
    2. Whisk the mixture vigorously until soft peaks form and the cream becomes fluffy and slightly stiff.
    3. Gently fold in the crushed candy corn, mixing just until evenly incorporated, ensuring some crunch remains visible.
    4. In a separate bowl, layer a spoonful of Greek yogurt or vanilla yogurt at the bottom of each serving glass.
    5. Add a layer of the whipped candy corn cream over the yogurt, spreading it gently to create an even layer.
    6. Repeat the layering process—yogurt followed by whipped candy corn cream—until the glasses are filled, ending with a whipped cream layer on top.
    7. Garnish the top of each parfait with whole candy corn for a colorful and festive finishing touch.
    8. Chill the parfaits in the refrigerator for at least 10 minutes before serving to allow flavors to meld and texture to set slightly.

    Notes

    Feel free to customize with additional fall decorations like sprinkles or a drizzle of caramel. Using different colored candy can add extra visual fun!
    This candy corn parfait is more than just a treat; it’s a whimsical celebration of the season’s quirkiest candy. Whether you’re entertaining guests or creating a cozy family dessert, it’s sure to spark smiles and nostalgia.

    Enjoy watching how the layers transform into a colorful mosaic that echoes Halloween’s playful chaos. It’s a small, sweet reminder that sometimes, the messiest desserts are the most memorable. No matter how you serve it, this parfait adds a festive touch to your autumn table.